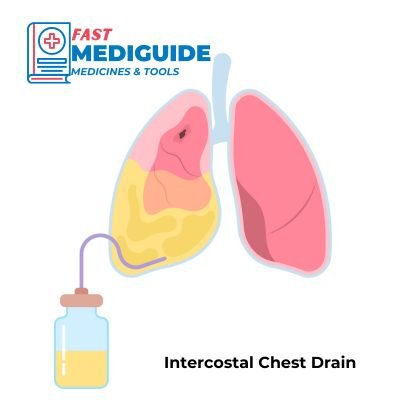
Intercostal Chest Drain (ICD), also known as Surgical Tube Thoracostomy is a surgical procedure where a tube inserted in the thoracic cavity of a patient to drain air or fluid in the pleural cavity.
It is a sterile procedure that is usually done in emergency department but sometimes in the ward or minor OT room. All patients with intercostal chest drain should be admitted if it was inserted in Emergency Department.
Indications
- Pneumothorax that is either persistent, traumatic, large or tension pneumothorax.
- Empyema
- Hemothorax
- Chylothorax
- Large or symptomatic Pleural effusion
Contraindications of Intercostal Chest Drain
Absolute Contraindications
No Absolute contraindications to chest drain insertion.
Relative Contraindications
These are factors that may affect chest drain insertion leading to either a change of site or a delay in inserting it, but are not absolute contraindications. Caution should be exercised in the presence of the following factors:
- Skin infection at site of insertion: Inserting chest drain at an infected site may cause infection to spread into the thoracic cavity and blood stream, causing more serious complications.
- Coagulopathy: bleeding disorder and very low platelet count poses a risk of excessive bleeding during the procedure. Blood products or coagulation factors may be required before procedure is performed.
- Pulmonary, Pleural or thoracic adhesions: depends on the location and severity.
Equipment and Preparation
Equipment needed for intercostal chest drain (ICD) is the following:
- Sterile gloves, gown, mask, drapes.
- Local anaesthetic e.g. lidocaine (lignocaine) 1% with or without epinephrine.
- 2 Haemostat or Kelly clamps.
- Cleansing solution such as Chlorhexidine or povidone iodine
- Non absorbable suturing material size 0 or 1-0 (silk or nylon).
- Scalpel, size 10-15 surgical blade.
- Petroleum gauze.
- Regular gauze and tape.
- 10mL syringes X2.
- Underwater seal bottle with at least 500ml of water and tube connected to it.
- Chest tube: size to use depends on indication and patient age or sex. Details on choosing the correct size is mentioned later.
- Needle driver.
- Needles 25G and 23G.
Patient Preparation
- Confirm identity of the patient.
- Explain procedure and ask for consent (oral or written).
- Exclude contraindications.
- Monitor SpO2, Pulse and BP.
- Confirm affected side clinically and with chest x-ray (Important!!).
- IV Access: needed in case there is need for resuscitation due to complications or reaction to anesthetics used.
- Patient Position: lift the arm of the affected side above head and touch the contralateral side ear with the hand or put it behind the head. Bed should be 30° to 60° inclined.
Anatomic Landmarks for Intercostal Chest Drain (ICD) insertion
Position: ICD is inserted in the intercostal space into the pleural cavity. General position is 5th intercostal space just anterior to mid-axillary line, nipple level offers quick landmark for 5th intercostal space.
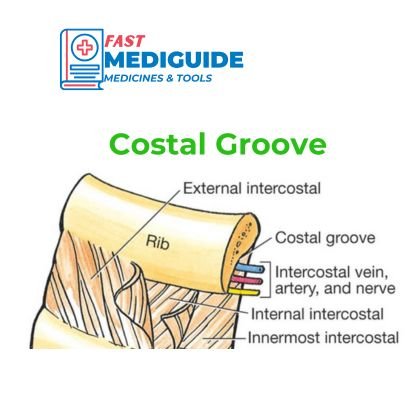
Neurovascular bundle: There is an intercostal vein, artery and nerve that run on the costal groove located on the lower border of each rib. This means chest drain should be inserted above the upper border of the rib to avoid blood vessel or nerve injury.

Step-By-Step ICD Insertion Procedure Description
- Position the patient as described above and expose the chest
- Scrub up and wear gloves + PPE
- Follow sterile procedure practices throughout
- Clean the insertion site (described above) with antiseptic
- Use drapes
- Anaesthesize the skin with local anaesthetic: start over the top of the 6th rib and infiltrate both skin and soft tissue including 5th intercostal space (above sixth rib).
- Infiltrate anaesthetic all the way to the parietal pleura. Pleural cavity is reached if air, fluid or blood is aspirate in the syringe.
- Open chest tube and clamp the side that will attach to underseal apparatus
- Make a skin incision 2 to 3cm long parallel to 6th rib and just above its top edge.
- Bluntly dissect soft tissue and intercostal muscles to the parietal pleura.
- Puncture pleura with tip of artery forceps. Sudden resistance decrease, air coming out (hissing) or blood confirms pleural cavity.
- Perform a 360° finger sweep and loosen any adhesions.
- Insert the chest tube with the clamp until all the drainage holes are inside pleural cavity.
- Connect to an underwater seal and remove clamp on the chest tube
Securing the Tube
There are many methods to secure chest drain tube. You can use any that works better for you:
- Perform circumferential suture around the tube and through the skin. Tie it tight enough to indent the cube slightly.
- Make a Purse-string suture and leave ends untied for use when removing the tube.
- Place petroleum gauze dressing around the tube.
- Tape dressing in place using pressure dressing.
Confirming Intercostal Chest Drain (ICD) placement
Confirm that the tube is in the pleural cavity and not subcutaneous tissue with the following methods:
- A bubbles through the fluid in the underwater seal bottle in case of pneumothorax.
- Blood or pus drains into the bottle in hemothorax or empyema respectively.
- Swinging of fluid in the lower end of the tube with respirations.
- Chest X-ray to confirm placement and another one after 12 to 24 hours to confirm lung expansion.
Tips and Common Errors
- Do not insert intercostal chest drain tube in the trauma laceration or wound. Insert it below or above the injury wound (preferable on the next intercostal space) if it lies on the insertion position.
- Underwater seal bottle must always be below patient’s chest level to avoid backflow of fluid.
- Chest tube insertion direction must be towards apex for pneumothorax and towards diaphragm for fluid or blood drainage because fluid accumulates from the lower part of the chest while air stays up. This helps in maximising volume drained.
Picking Correct Size for ICD
Correct size of chest drain tube depends on the intended use, sex and age of the patient. Below is the recommended size range for different indications:
- Pneumothorax: A smaller size is recommended usually 20-24F
- Fluid and Blood (haemothorax): 28-36F
- Men: 28-32F
- Women:28F
- Children: size 12 to 28F
Complications of Chest Drain Insertion
Most of the complications of inserting Intercostal chest drain can be avoided with the following techniques:
- Internal organ Injury (lungs, heart, liver, diaphragm): injury can be avoided by being more careful and avoid using trocar.
- Infection: proper cleaning, dressing and using aseptic technique during the procedure.
- Surgical Emphysema: maker a smaller hole, make sure all drainage holes are in the pleural cavity and suture properly.
- Tube not draining: May be due to kinking or incorrect placement e.g. subcutaneous tissue.
After Care and Removal
ICD should be kept in place until full lung expansion occurs i.e. resolution of pneumothorax or hemothorax.
Use of adequate analgesia such as Paracetamol and NSAIDs or weak opioids is important for patient comfort.
Removal of Tube Thoracostomy
Intercostal chest drain removal requires patient cooperation in order for it to be successful. Patient’s lungs should be fully expanded during removal to prevent air from entering the pleural space:
- Ask patient to perform Valsalva manoeuvre by taking deep breath and blowing against closed mouth and blocked nose.
- Cut the anchoring stitch
- Ask the assistant to withdraw the tube while you tie the purse-string suture.
- Dress the wound again
Repeat chest X-ray after removal is important to assess recurrence of pneumothorax. Sutures can be removed after 5 to 7 days.